
When it comes to exterior painting, you can pick the most beautiful color and the highest-quality paint, but without proper preparation, your work will likely fade, peel, or crack much sooner than expected. Many homeowners are shocked when their paint job starts showing signs of wear just a year after they’ve had it done. This can be frustrating, especially if you’ve put a lot of time and effort into choosing the perfect hue.
The truth is, good prep is the key to a long-lasting paint job. When you properly prep your house, the paint adheres better, lasts longer, and enhances the overall appearance of your home.
In this post, we’ll break down each step in the exterior painting prep process, highlight some common mistakes, and explain why sometimes it’s worth it to hire a professional to handle the prep work.
Why Proper Prep Makes or Breaks an Exterior Paint Job
When we talk about “paint prep,” it’s more than just washing the surface and slapping on some primer. Prep is an essential part of the painting process that involves cleaning, repairing, scraping, sanding, and priming—each of these steps plays a role in making sure your paint sticks, lasts, and looks good.
Paint adhesion, durability, and visual appeal all rely on a clean, smooth, and dry surface. Without this foundation, your paint is at risk of blistering, fading prematurely, or even harboring mildew growth.
You might wonder, “Why didn’t my last paint job last more than two years?” Often, the culprit is poor prep work. Whether it was skipping a cleaning step or not properly priming the surface, improper prep can significantly affect the longevity of your paint.
Pro Insight: Seasoned painters will tell you that they spend just as much time prepping a surface as they do painting it. Proper prep can make all the difference between a job that lasts 5–10 years and one that needs to be redone in just a few.
Step 1: Inspect the Exterior
Before you even pick up a brush or pressure washer, start by walking around your home and inspecting its exterior. Look for any visible damage, wear, or issues that need attention.
Things to look out for:
- Peeling paint: This is usually a sign of moisture problems or poor adhesion from the previous paint job.
- Wood rot or damaged siding: If your siding is compromised, painting over it won’t solve the issue. The rot needs to be replaced.
- Mildew and stains: Mold and mildew can affect both the appearance and longevity of your paint job. Clean them off properly before you paint.
- Gaps around windows/doors: These gaps can let moisture in, leading to issues down the road if not sealed properly.
Take note of any problem areas you find and plan for repairs before you begin painting. It’s important to fix these issues before the paint goes on—painting over them will only make things worse and could result in the damage reappearing later.
Step 2: Clean the Surface Thoroughly
One of the most crucial steps in prepping for exterior painting is thoroughly cleaning the surfaces. Dirt, grime, mildew, pollen, and loose paint can all prevent your new paint from adhering properly.
Cleaning Methods:
- Pressure washing is often the most effective way to clean a home’s exterior. It removes dirt, loose paint, and grime, leaving the surface ready for the next step.
- Hand scrubbing can be an alternative, especially for smaller areas or delicate surfaces.
- If you’re dealing with mold or mildew, use a mild detergent mixed with bleach. This will help eliminate the mildew and prevent it from coming back.
Once you’ve cleaned the surfaces, let them dry completely—this could take 1 to 2 days depending on your climate. If you try to paint before everything is dry, you could end up with blotchy or uneven results.
Pain Point: If your new paint job ends up looking blotchy or uneven, it could be due to surface grime or moisture that was trapped underneath the paint. This is why cleaning is such an important part of the prep process.
Warning: Be careful not to use too much pressure when washing, especially on delicate surfaces like wood or stucco. Using too much pressure can damage the surface, leaving you with more work than you started with. Hiring a professional with the right equipment can help avoid this issue.
Step 3: Scrape and Sand
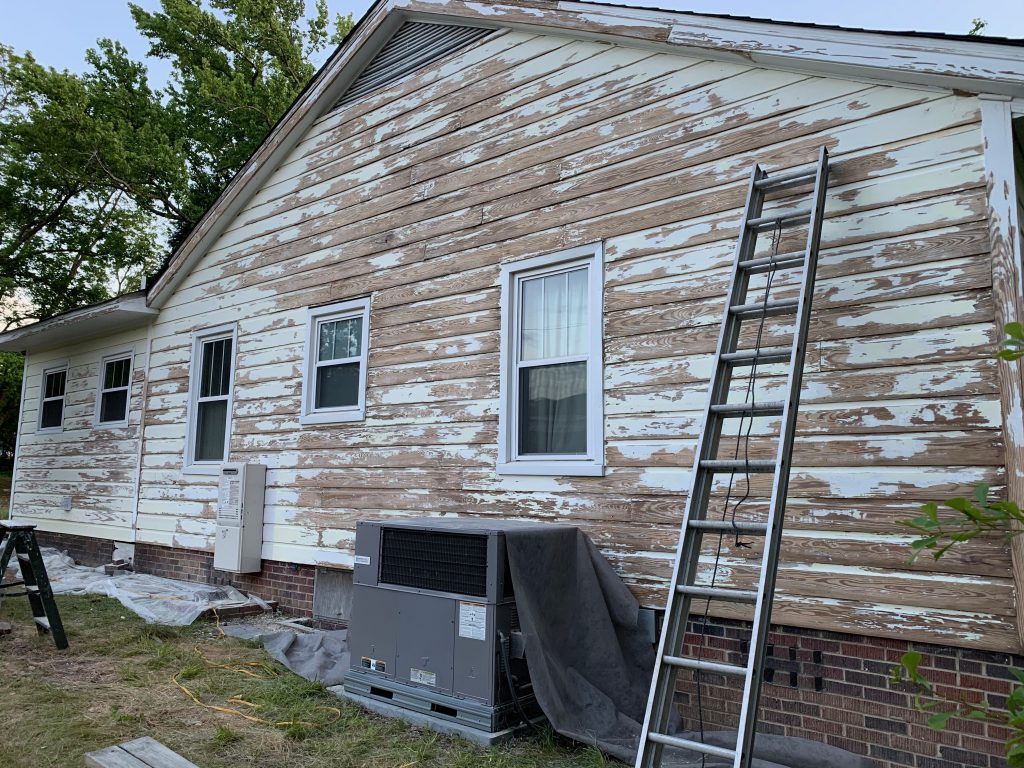
Once your surface is clean and dry, it’s time to tackle any loose or flaking paint. Scraping off the old, damaged paint is crucial for a smooth, clean surface.
Scraping:
- Use a scraper or putty knife to remove any peeling or bubbled paint. Be sure to get rid of all the loose paint; any remaining flakes will cause the new paint to chip.
- Feather the edges of the scraped areas to create a smooth transition between the old and new paint. This will help blend the surface and avoid visible edges once your new paint is applied.
Sanding:
- Sand any bare wood areas to help the primer adhere better. Sanding also smooths out rough patches, allowing for a more even paint job.
- If you’re using an electric sander, make sure to use the right type of sandpaper for your surface.
Safety Tip: If you’re scraping or sanding old paint, especially if the home was built before 1978, there’s a chance that lead paint could be present. It’s essential to follow lead-safe practices and wear the appropriate personal protective equipment (PPE). If you’re unsure, it’s best to consult a professional.
After scraping and sanding, dust off the surface thoroughly before moving to the next step.
Step 4: Make Necessary Repairs
Now that the surface is clean and smooth, it’s time to make any repairs. Look for damage that needs to be fixed before painting:
- Replace rotting wood or cracked trim that’s beyond repair.
- Fill holes and caulk any gaps around windows, doors, and joints. Gaps can allow moisture to get behind your paint, causing damage over time.
- If you have gutter issues or leaking downspouts, repair them before painting to avoid water damage in the future.
Pro Tip: Paint won’t hide imperfections—it highlights them. So, taking the time to properly fix any damage now will save you from dealing with ugly results later.
One common DIY mistake is painting over moisture-damaged wood. This traps the moisture underneath and can cause the paint to peel, crack, or even develop mold later on.
Step 5: Prime the Surface
Primer is an essential step in the prep process, particularly for exterior jobs. It seals the surface, improves paint adhesion, and helps to block stains or dark colors from bleeding through the new coat.
There are different types of primers for different needs:
- Oil-based primer is great for weathered wood.
- Stain-blocking primers are best for surfaces with water or mildew stains.
- Bonding primer is ideal for hard-to-stick surfaces like glossy or previously painted areas.
If you’re painting a large area with raw wood or other porous materials, you’ll need to apply a full coat of primer. For smaller repairs, you can often spot-prime the affected areas.
Pain Point: You might be wondering, “Can’t I just use a paint-and-primer-in-one product?” While this can be convenient for some projects, it’s not ideal for exterior jobs with significant damage or raw wood. A separate primer will give you better adhesion and coverage.
Pro Tip: The right primer makes a huge difference in the durability and color of your final paint job. Professionals know how to choose the right primer for your specific surface.
Pro Prep vs DIY Prep: What’s the Difference?

The truth is, proper prep work takes time. While DIYers often rush through the process, professionals spend 1–3 days just preparing the surface. Here’s why:
Time:
- Pros spend more time prepping, ensuring that the surface is ready for paint and not rushed.
Tools:
- Professionals use commercial-grade equipment like high-powered pressure washers, sanders, and HEPA vacuums to make sure the prep is done efficiently and safely.
Safety:
- Pros use safety gear like fall protection, lead-safe practices, and PPE to minimize risk.
Skill:
- Pros are trained to spot underlying issues like water intrusion or failing caulk, which DIYers might miss.
Pain Point: If you’re thinking, “I want to save money by doing it myself,” consider that a rushed DIY prep job can lead to repainting in just a couple of years. Investing in a professional prep could save you money in the long run.
Even if you plan to paint yourself, consider hiring a pro for the prep work. It’s the foundation for a lasting, beautiful finish.
Common Exterior Paint Prep Mistakes to Avoid
- Not cleaning thoroughly: Dirt and grime lead to poor paint adhesion.
- Painting before the surface is dry: Moisture underneath the paint can cause blotches.
- Skipping primer: Primer is essential for paint durability and smoothness.
- Ignoring caulking or repairs: Gaps and damage will show through the paint.
- Painting over mildew: This traps moisture and causes mold to grow underneath.
- Using interior-grade materials outside: Exterior paint and primer are specially formulated for weather resistance.
Avoiding these mistakes will ensure that your paint job lasts longer and looks professional.
Local Factors That Affect Prep Work
Your location matters when prepping for exterior painting. Different climates affect your prep process:
- Humid areas: Mold and mildew are more common and
require extra cleaning.
- Coastal zones: Salt damage can erode surfaces faster, requiring extra care.
- High sun exposure: Surfaces may need more frequent touch-ups due to UV breakdown.
Your home’s age and siding type also play a role. Older homes may have lead paint or deteriorating siding, while different materials like wood, brick, or stucco all need specific prep.
A professional painter can tailor the prep process to suit these factors.
Timing Your Paint Project: When to Start Prep
Start prepping your home 1–2 weeks before the ideal painting weather. The weather should be dry, with moderate temperatures. You want to avoid painting in wet seasons or during extreme heat or cold.
This lead time also gives you space to allow repairs to cure and surfaces to dry completely. Plus, booking a professional early ensures availability, especially during peak seasons.
Final Thoughts
Proper prep is the foundation of a durable, professional-looking paint job. Skimping on this crucial step means you’ll likely need to repaint sooner than expected, and it could even cause damage to your home. Whether you decide to go the DIY route or hire a professional, make sure you understand the importance of prep and avoid cutting corners.
Ready to paint but not sure where to start? Let our experienced team handle the prep and painting for results that last. Contact us today for a free exterior painting estimate tailored to your home’s needs.